Sony DSC-QX10 Camera System Software Update Guide for Mac OS X
Determine if Your Camera Needs the Update
This update is only for DSC-QX10 cameras that currently have firmware versions lower than 2.00.
If your camera firmware version is 2.00, this update is not necessary.
Check if your camera is already updated to firmware version 2.00:
- Connect your camera and smartphone using the PlayMemories Mobile app.
- Select the Program Auto mode.
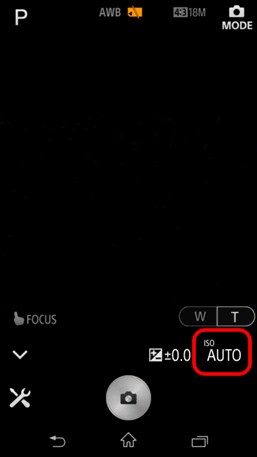
On your smartphone with the MODE screen displayed, if "ISO" is displayed above AUTO, your firmware is already updated to version is 2.00 and does not need this update.
Note: If "ISO" is not displayed, please download and install the firmware update.
Download and Update the Firmware
- Download the Update_DSCQX10V2.dmg file to a temporary or download directory (please note this directory for reference).
- Go to the directory where the file was downloaded and double-click the Update_DSCQX10V2.dmg file.
Note: Do not connect the camera to the computer yet. - Double-click the "Firmware Updater"
 icon.
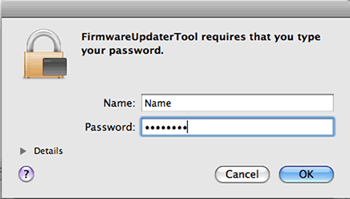
icon. - At the Password prompt screen, enter the Name and Password for the administrative account, and then click "OK".
- Ensure the memory card is removed from the camera.
- Power on the camera.
- Connect the camera to your computer using the supplied USB cable.
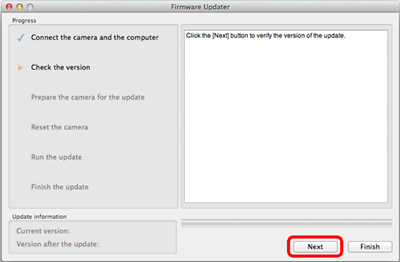
- At the "Firmware Updater" screen, click "Next".
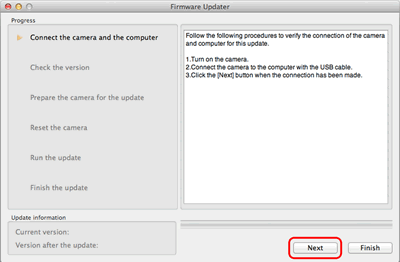
WARNING!!: Do not power off the camera or disconnect the USB cable until the update process is complete. - When the updater recognizes the camera connection, the next "Firmware Updater" screen is displayed on the computer, and the camera screen displays a no memory card icon.
- At the "Firmware Updater" screen, click "Next".
- When the following screen is displayed, check the version number at the lower left.
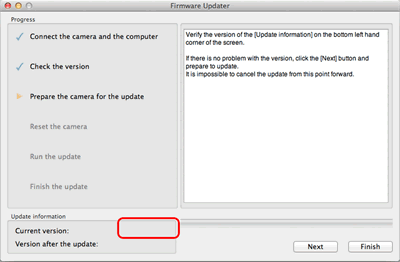
If the current version is lower than 2.00, click "Next".
Note: If the current version is "2.00", your camera does not need this update. Stop the USB connection and click "Finish". Then power off the camera, briefly remove the battery pack, and then power on the camera again.
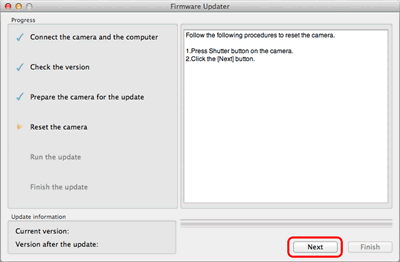
WARNING!!: Do not disconnect the USB cable from the camera or the computer. - Reset the camera.
To reset the camera, press the Shutter button on the side of the camera.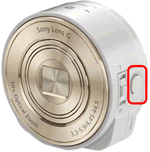
Note: The screen will turn off after pressing the Shutter button. Please continue to the next step. - At the "Firmware Updater" screen, click "Next".
- "Run".
Note: The update process takes about ten minutes to complete.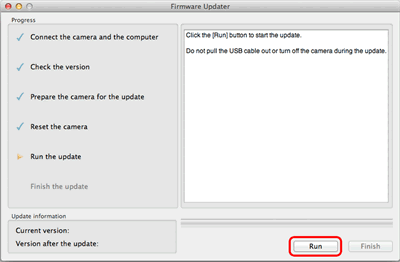
WARNING!!: Do not power off the camera or disconnect the USB cable until the update process is complete. - When the following screen is displayed, click "Finish".
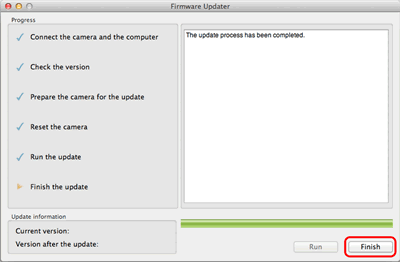
- You may now disconnect the USB cable.
- Power off the camera and remove the battery pack. Then reconnect the battery pack and power the camera back on.
Check the Firmware Version After Updating (optional)
- Connect your camera and smartphone using the PlayMemories Mobile app.
- Select the Program Auto mode.
- On your smartphone with the MODE screen displayed, verify that "ISO" is listed just above "AUTO". This confirms the firmware version is 2.00.
If "ISO" is displayed above AUTO, the firmware update was successful.
Note: If "ISO" is not displayed, please download and install the firmware update again.